At VARLab – Virtual & Augmented Reality Lab, we created the Virtual Electrical Lab exclusively for Conestoga College professors and students in electrical courses. I played an integral role throughout the project’s design and development journey.
My role: UX Design, UI Design, Usability Testing Team: I was the only designer in a team of ~15 developers, PM, and 3D artists Tools: Figma, Jira, Confluence Timeline: May 2023 – August 2023 (4 months)
Business Impact
Direct Impact – 30% Cost Saving: The Virtual Electrical Lab results in a 30% cost saving compared to buying physical training devices, resulting in significant monetary benefit for the institution.
Indirect Impact – Attracting More Students: With improved learning techniques through the introduction of the virtual lab, we anticipate an increase in program enrollment.
Project objective
Create a workbench-style virtual lab environment for students to hone their understanding of electrical circuits through interactive practice.
Understanding
How students learn in class
I conducted interviews with subject-matter experts to understand how students learn in class using the following 3 things:
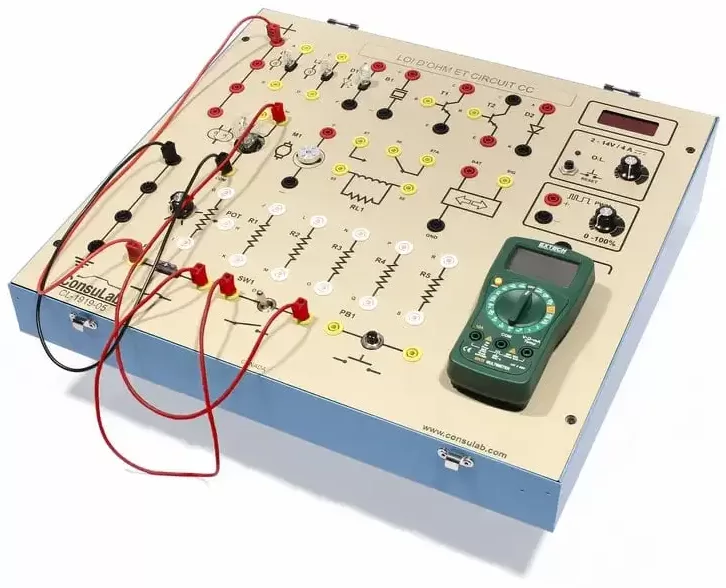
Ohm's Law & DC Circuits trainer with jumper leads attached
🔌 Ohm’s Law & DC Circuits trainer This device is used to teach common electrical system components and circuit operation.
〰️ Jumper Leads To build a circuit, red and black jumper leads are inserted in different sockets.
📝 Instructions Sheet Reading all the instructions first is crucial because they can alter the approach.
Stakeholders' Requirements
Real-World Experience: Create an experience that closely mirrors real-world situations.
Modular Labs: Each of the 10 identified tasks (Labs) needed to be standalone, not integrated into a single simulation. This separation would allow them to be assigned separately for homework and enable tracking via the Learning Management System (LMS).
Student Devices: Students shall be able to access and play the simulations directly from eConestoga (the LMS) on their laptops that meet program device requirements.
Constraints
Laptop Variety: Students would access the simulation on their laptops, some with smaller screens as compact as 13 inches.
No Full-Screen Preference: Existing research indicates that users avoid using full-screen mode. As a result, we needed to utilize the available space within the browser window efficiently.
Meet Zach, the user.
Zach, student of the Heavy Duty Equipment Technician program.
Age: 23 years (ages of other students in the program range from 18-35)
Goal: Being able to repair electrical problems in Heavy Duty Equipment
Pain Point: In-class practice with college-owned training devices alone is insufficient to achieve the desired level of proficiency in electrical circuits.
The information above comes from two sources: 1. Interviews with subject-matter experts and 2. The project charter.
Problem Statement
Zach, a Heavy Duty Equipment Technician program student, needs to practice his electrical circuit building and troubleshooting skills beyond class hours because in-class practice with college-owned physical training devices alone is insufficient to achieve the desired level of proficiency.
Design Process
How might we...
HMW design a simulation that provides Zach with hands-on practice building and troubleshooting electrical circuits beyond class hours?
HMW structure the ‘labs’ such that each of the 10 identified tasks can be completed independently while seamlessly integrating into the LMS?
HMW efficiently utilize available browser window space on various laptop screen sizes, especially compact 13-inch screens?
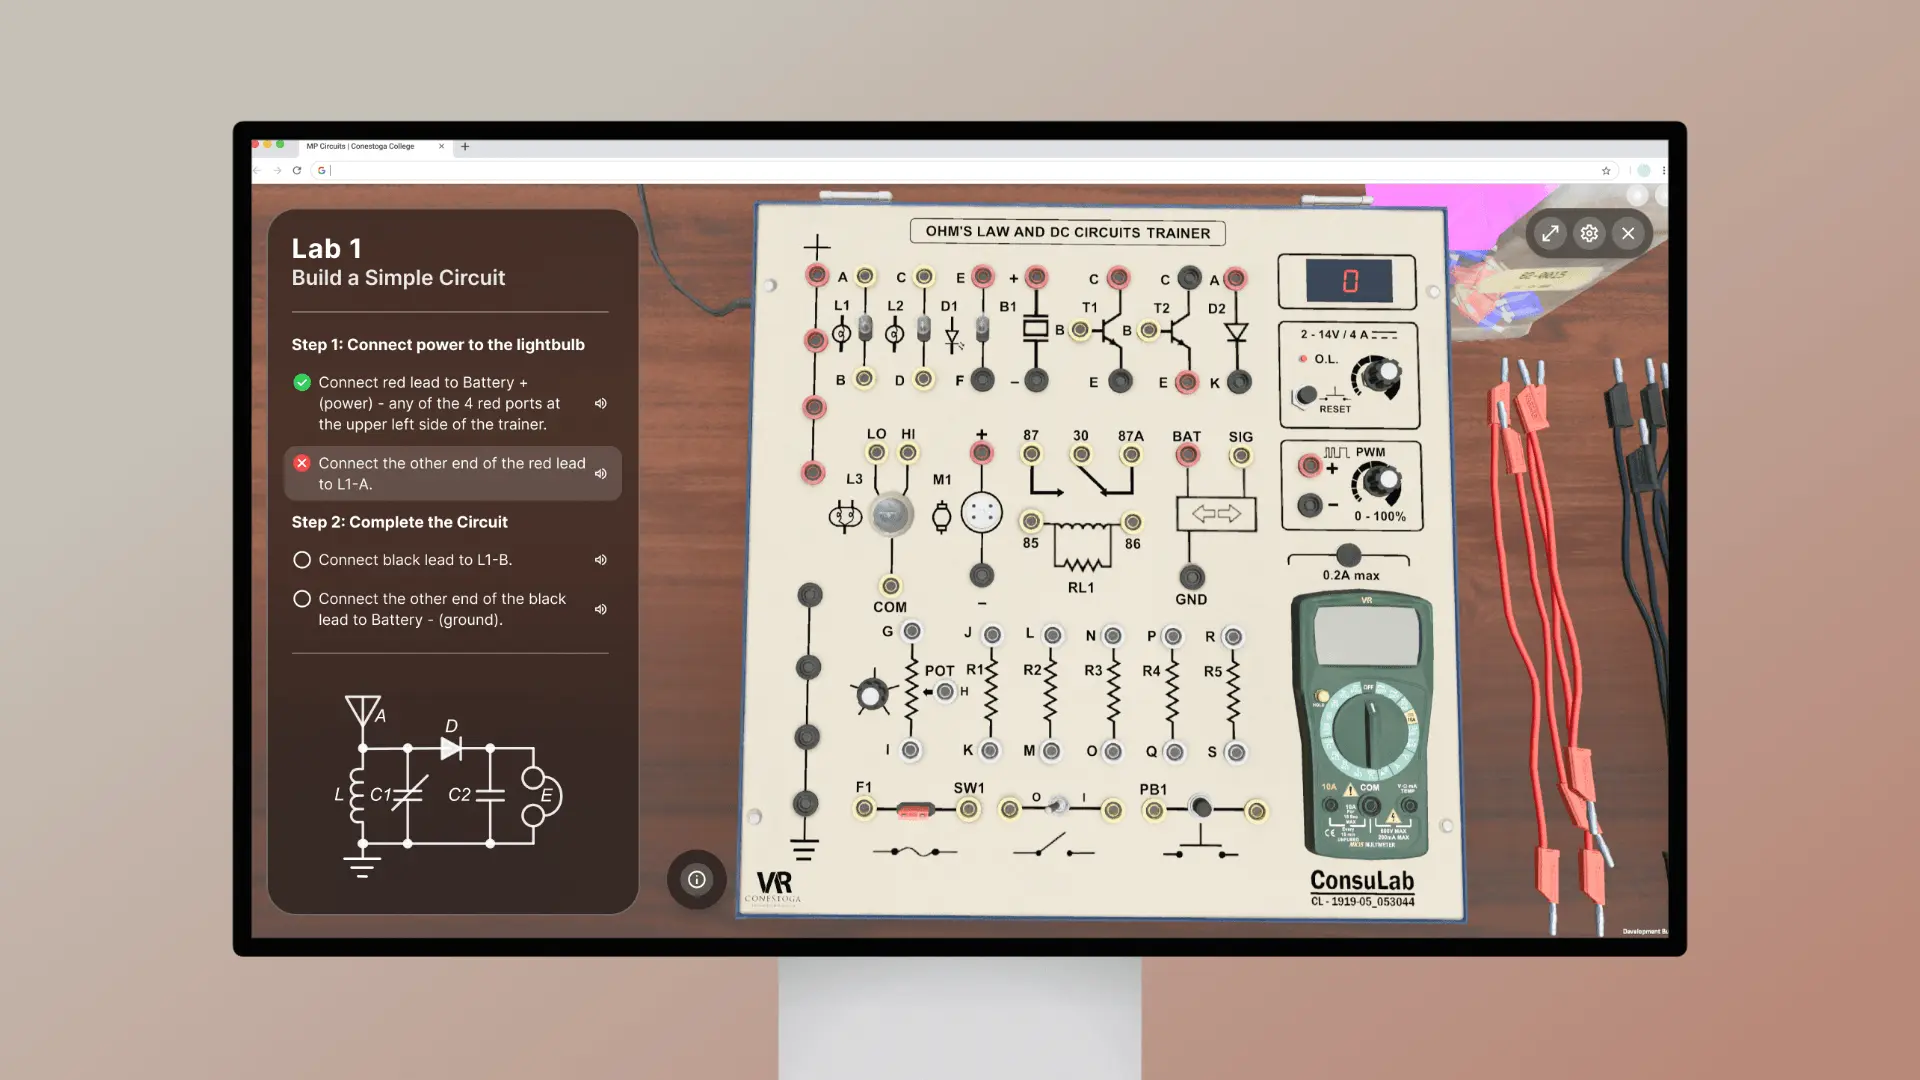
Layout of the Workbench-Style Virtual Lab
We chose this layout because:
The visual hierarchy encourages reading instructions before starting work on the circuits by utilizing English-speaking people’s natural eye movement patterns.
Users can easily see the instructions and the board simultaneously, making it straightforward to relate the instructions to the circuits.
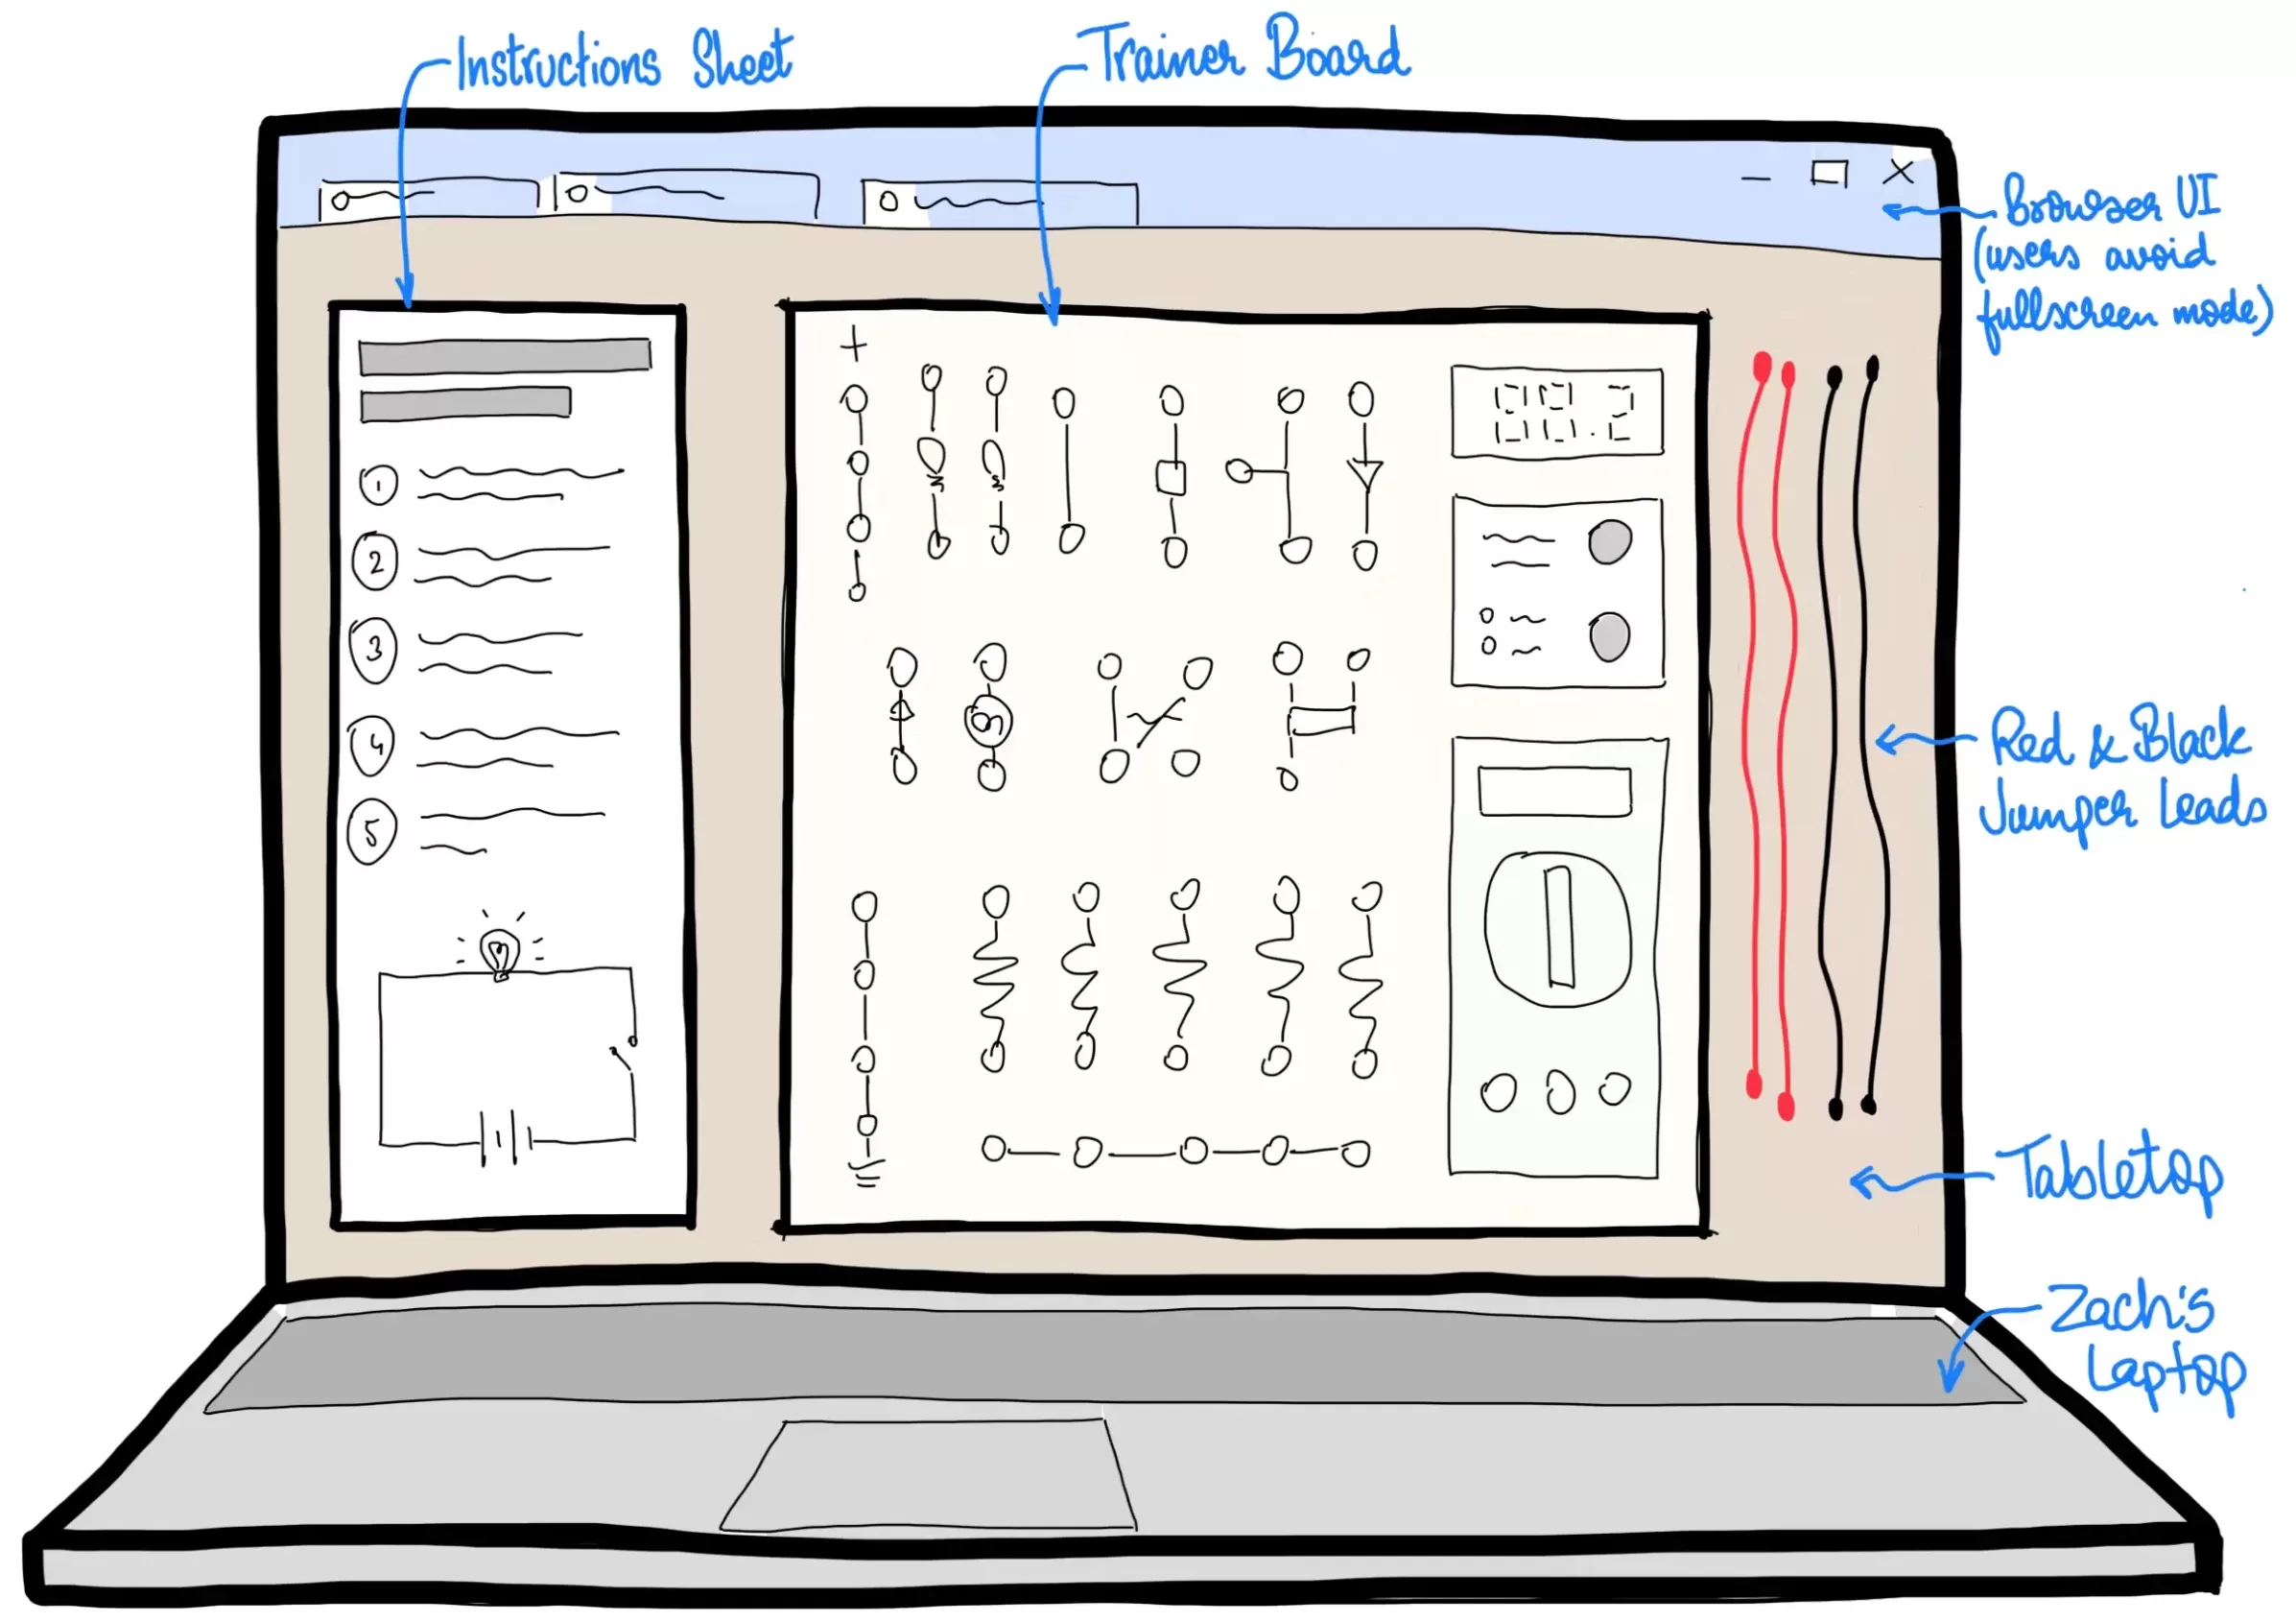
Wireframe showing the main interface as seen by Zach, our user.
How it all integrates with the LMS
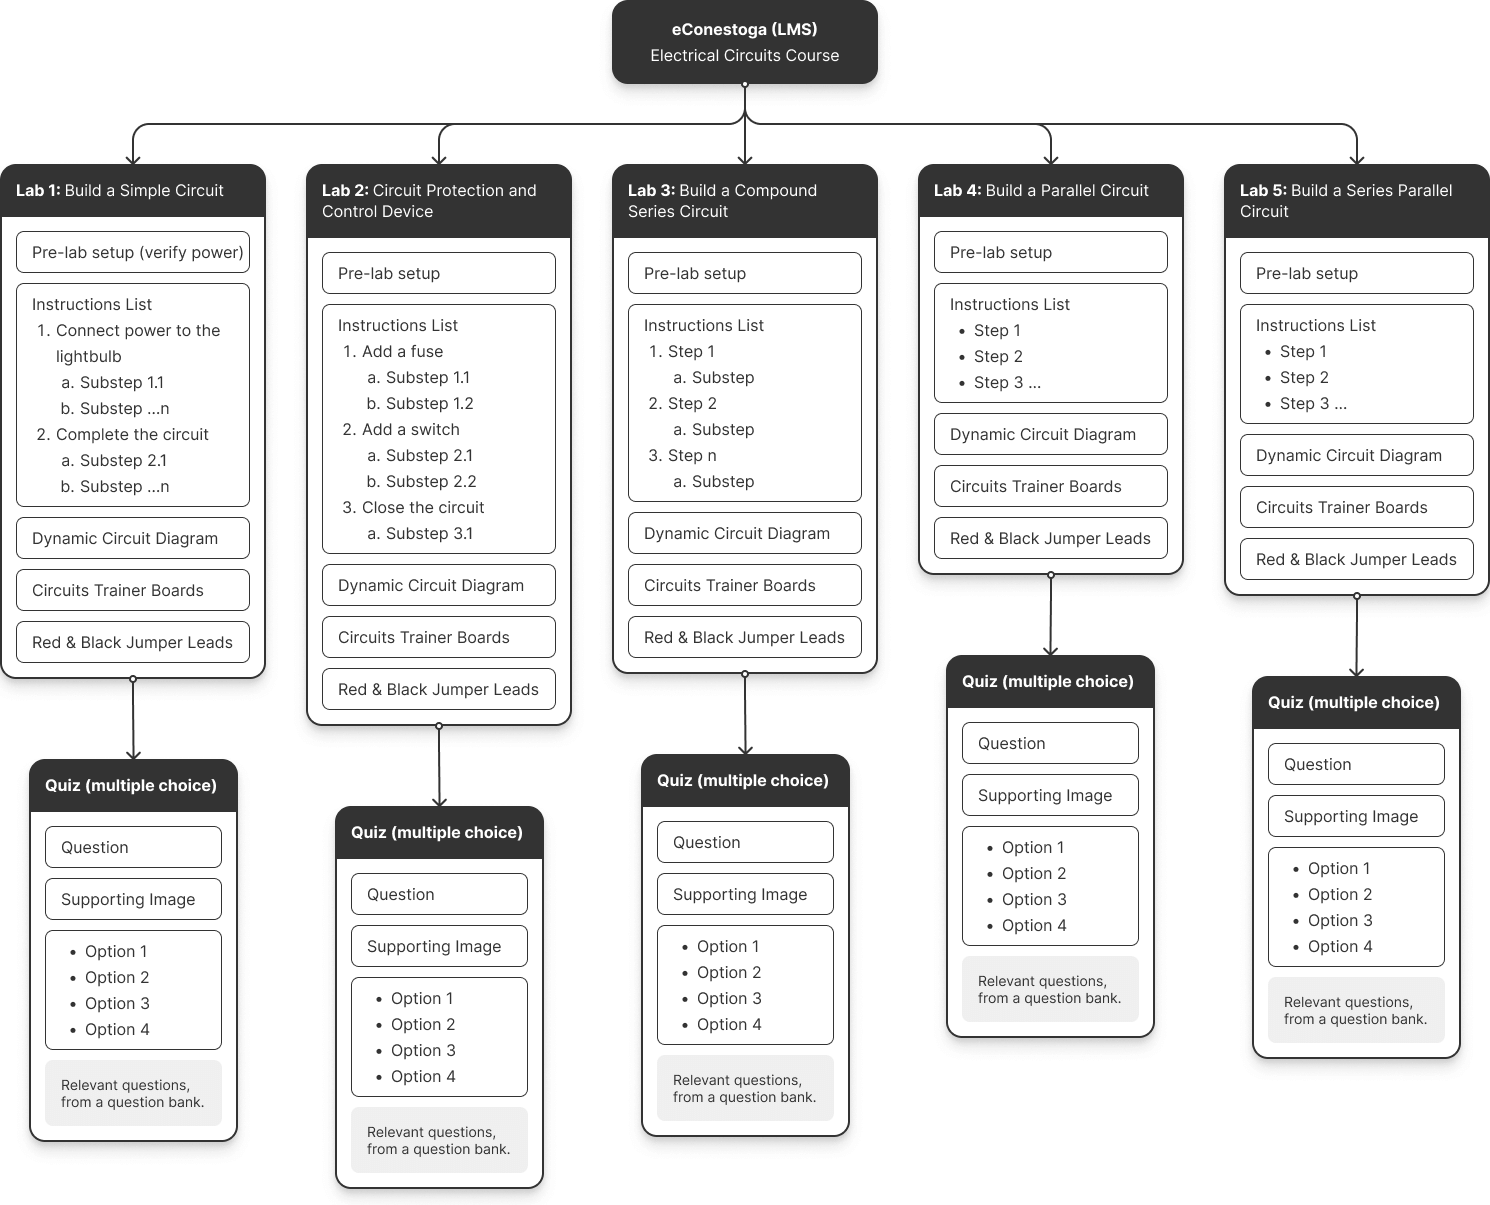
As specified in the project charter, I designed 10 standalone simulations that integrated with the existing Learning Management System (LMS), eConestoga.
Below, is a diagram illustrating the Information Architecture for the first few labs. (Click the image to zoom)
Learnings from Testing a Low-fi Prototype
Unity developers & 3D artists helped build this prototype. The user testing participants were 2 students and 2 professors. While this is not ideal, it made sense for the time and resources we had available and helped us make crucial decisions.
Task 1: Connect a red and a black jumper lead to any of the sockets on the Circuits Trainer Board. Task 2: Move the black lead to a different socket. Task 3: Remove the red lead altogether. Task 4: Set the voltage regulator to 10V. Task 5: Set the digital multi-meter to 20V DC.
Aim: Identify the most intuitive interactions to connect, relocate and remove a jumper lead and to operate the knobs.
Observations:
Users expected a drag-n-drop interaction for placing, relocating, and removing the red & black jumper leads, as opposed to the right-click left-click interaction initially proposed.
There were instances when the users tried connecting a jumper lead to an element that wasn’t a socket. We decided to add snapping and highlight on hover as signifiers of where users could place the jumper leads.
All participants failed to operate the knobs of the voltage regulator or the digital multi-meter. We had to find a way to adapt this physical interaction for the digital experience.
PS – Omitting additional insights and feedback to keep the case study concise.
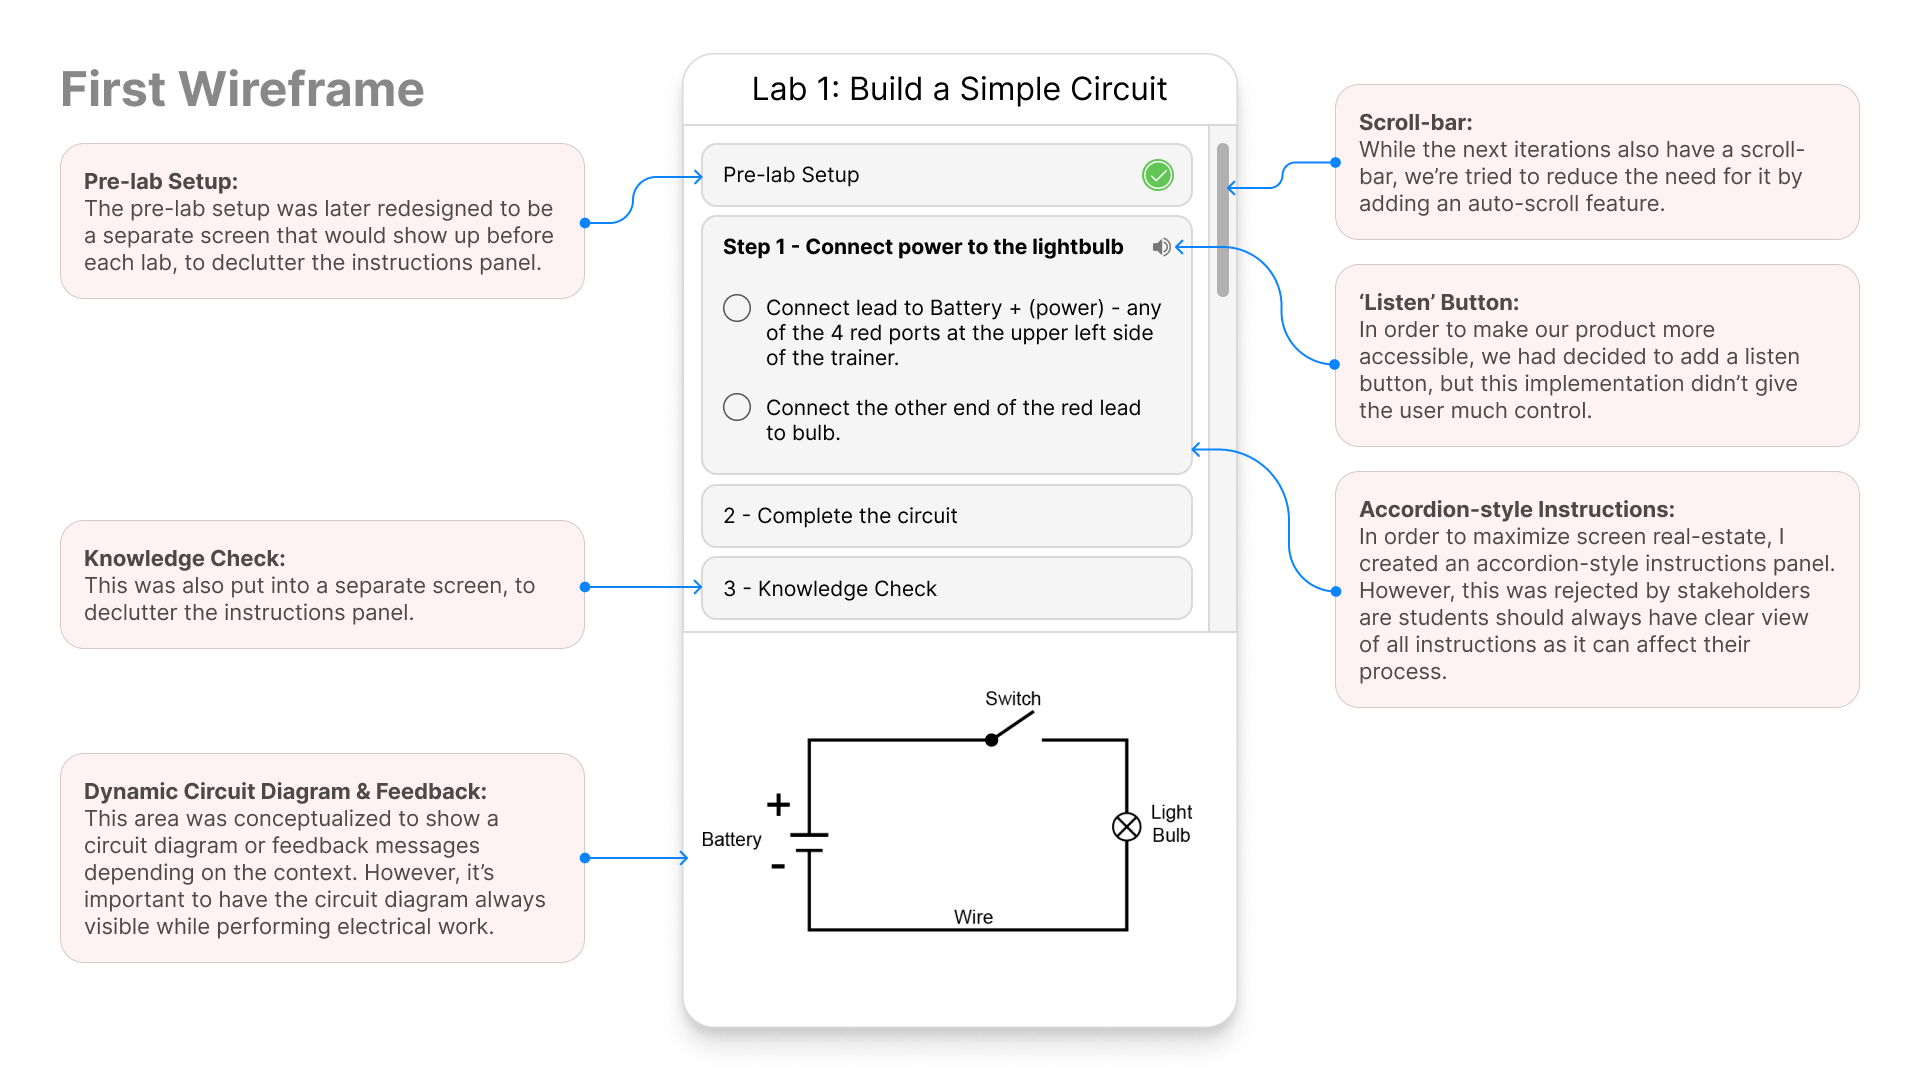
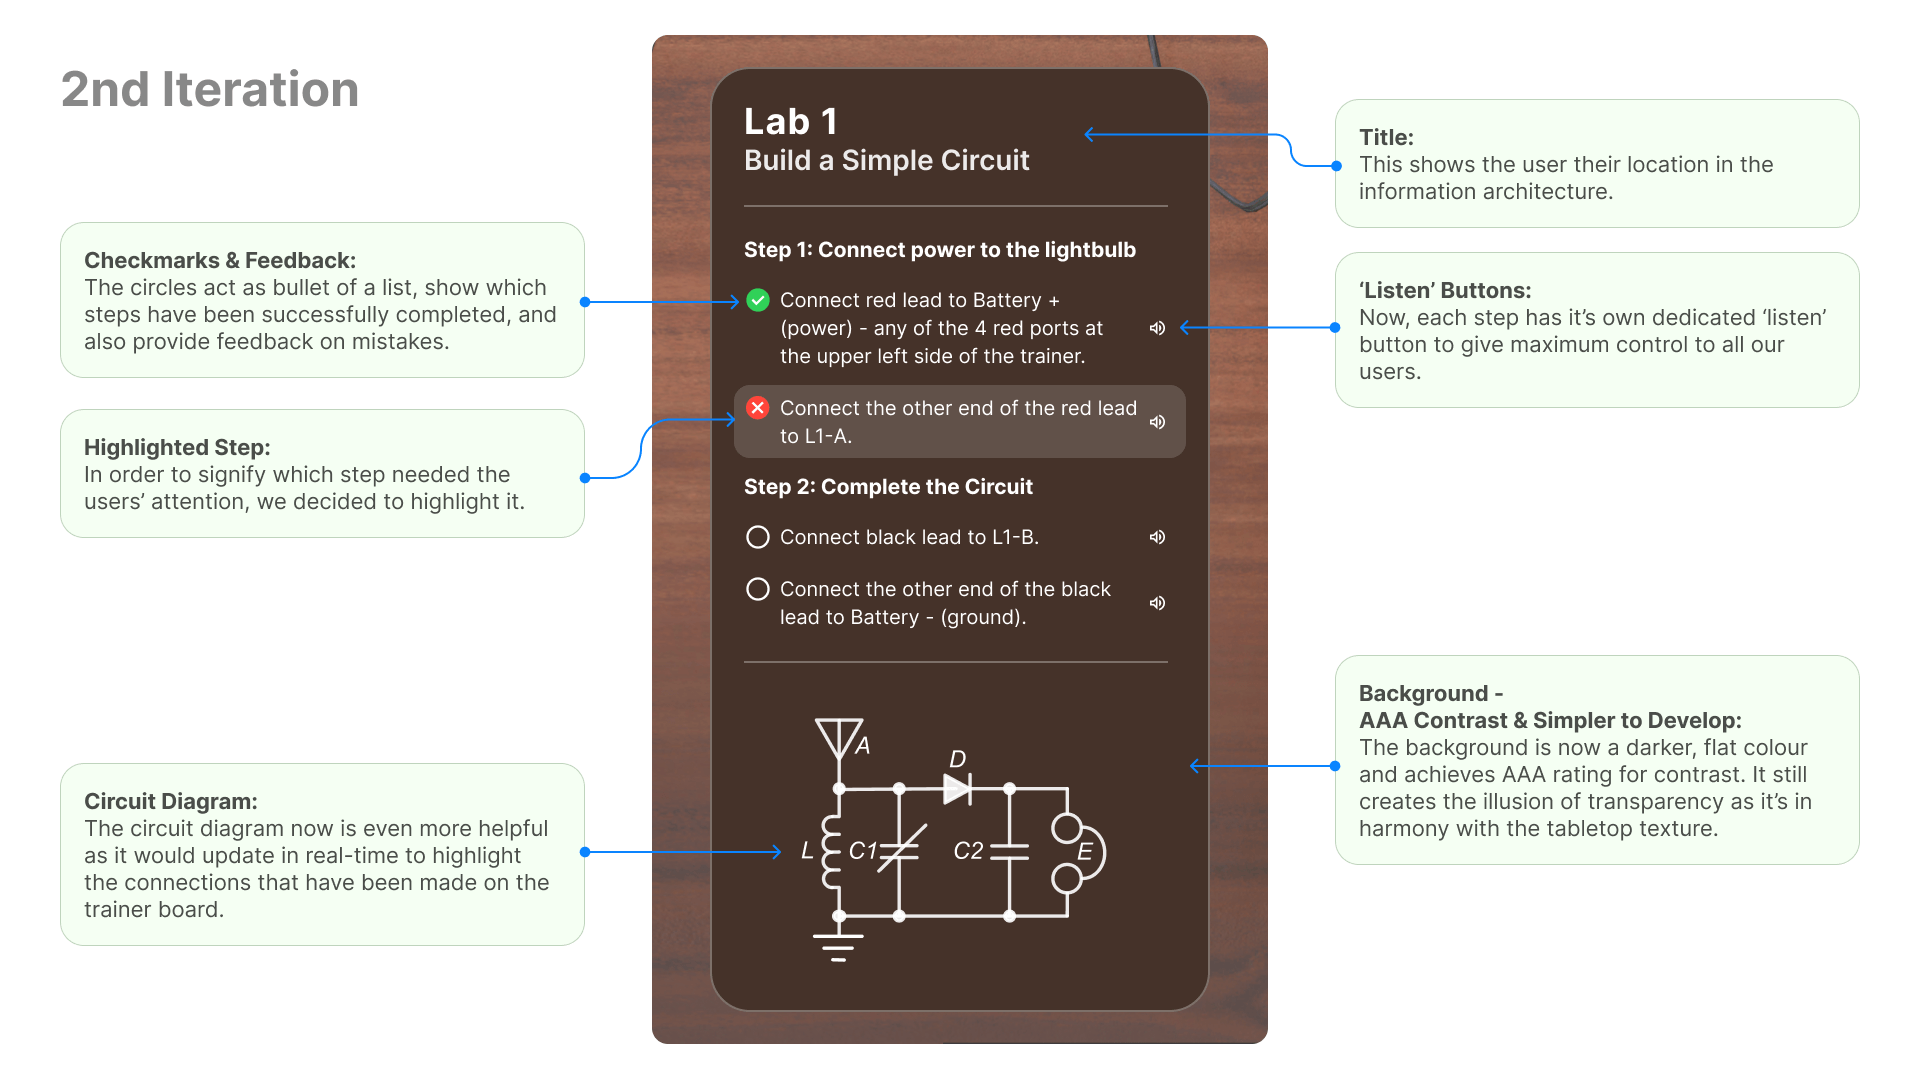
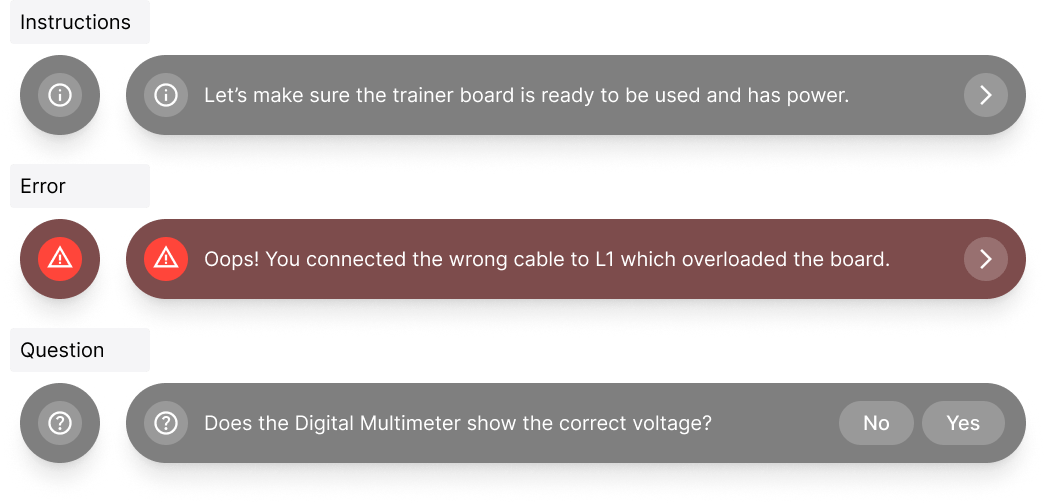
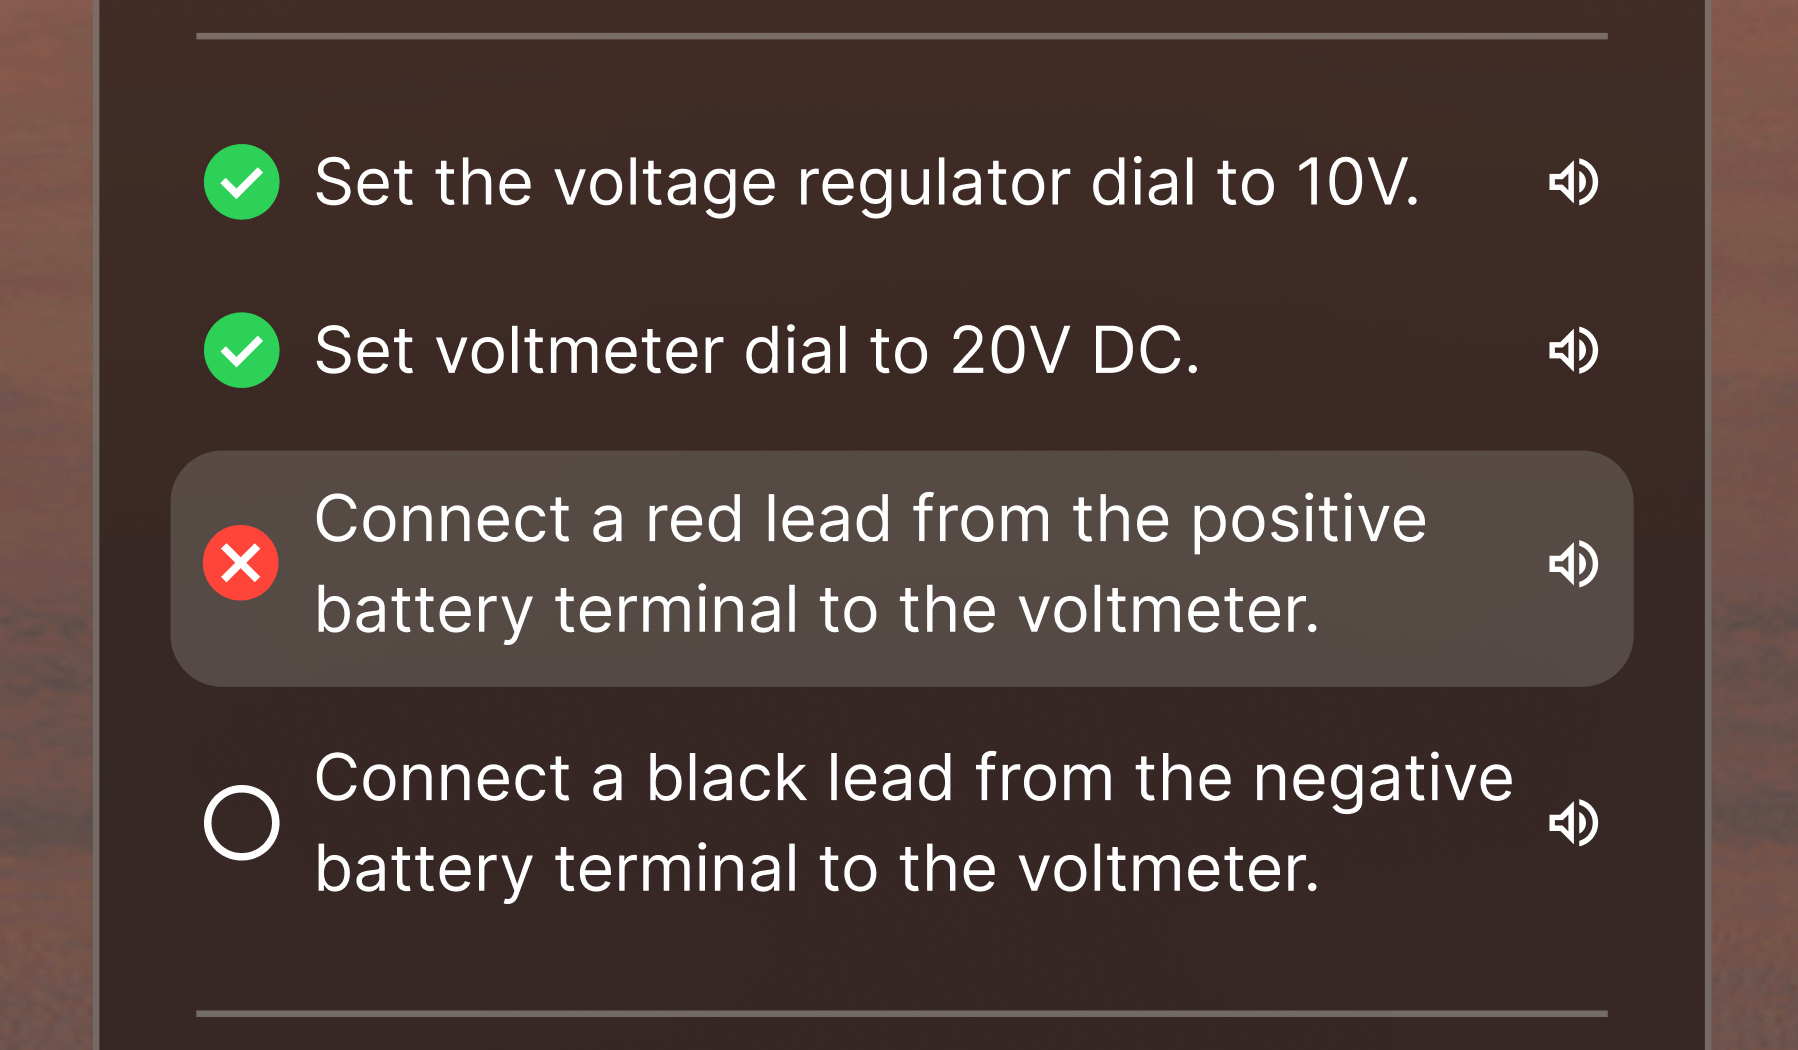
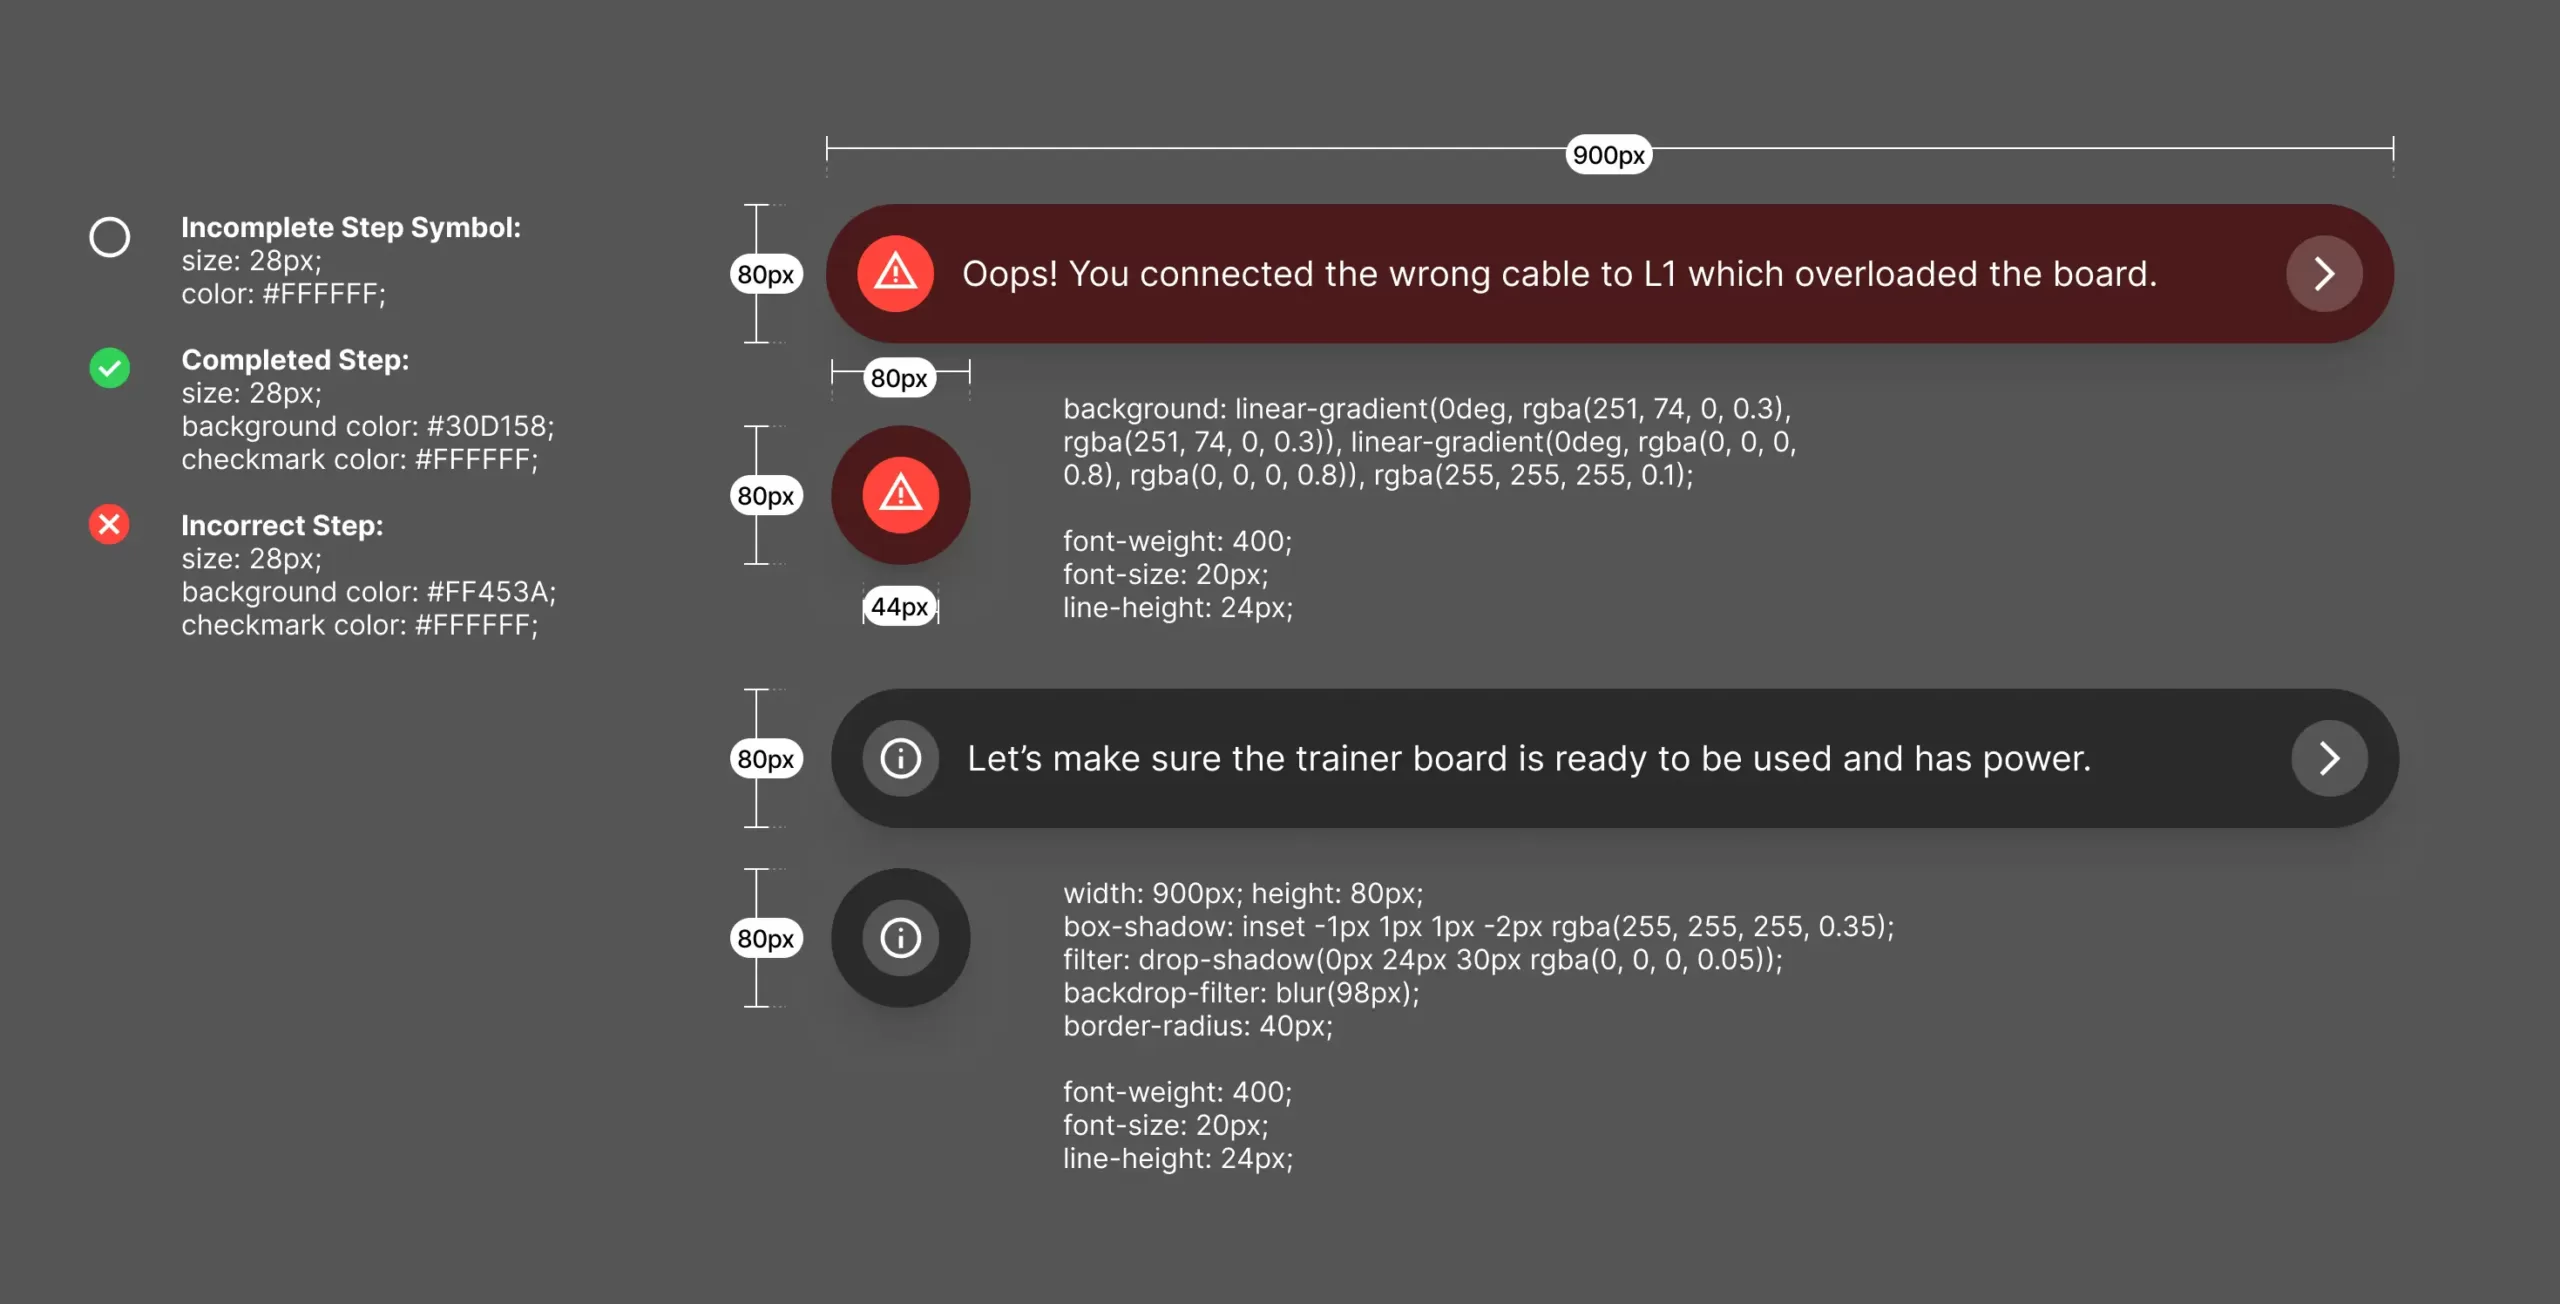
Evolution of the Instructions Panel
The instructions panel became the primary UI element for us to communicate with our user.
Improving Knob Interactions
During user testing, no one could figure out how to use the knobs on the voltage regulator or the digital multi-meter. So, I designed new interactions using radial sliders.
Accessibility & Feedback
Inclusive Visuals: We use colors and icons alongside text to ensure information is universally understandable.
Auditory Support: Enhancing accessibility, we’ve introduced a text-to-speech feature catering to those who prefer auditory instructions.
WCAG Compliance: Every text meets the AA level standard of Web Content Accessibility Guidelines (WCAG) for maximum inclusivity.
Highlighted Interaction Points: Trainer board sockets and jumper leads are highlighted to guide users effectively, signifying their affordances.
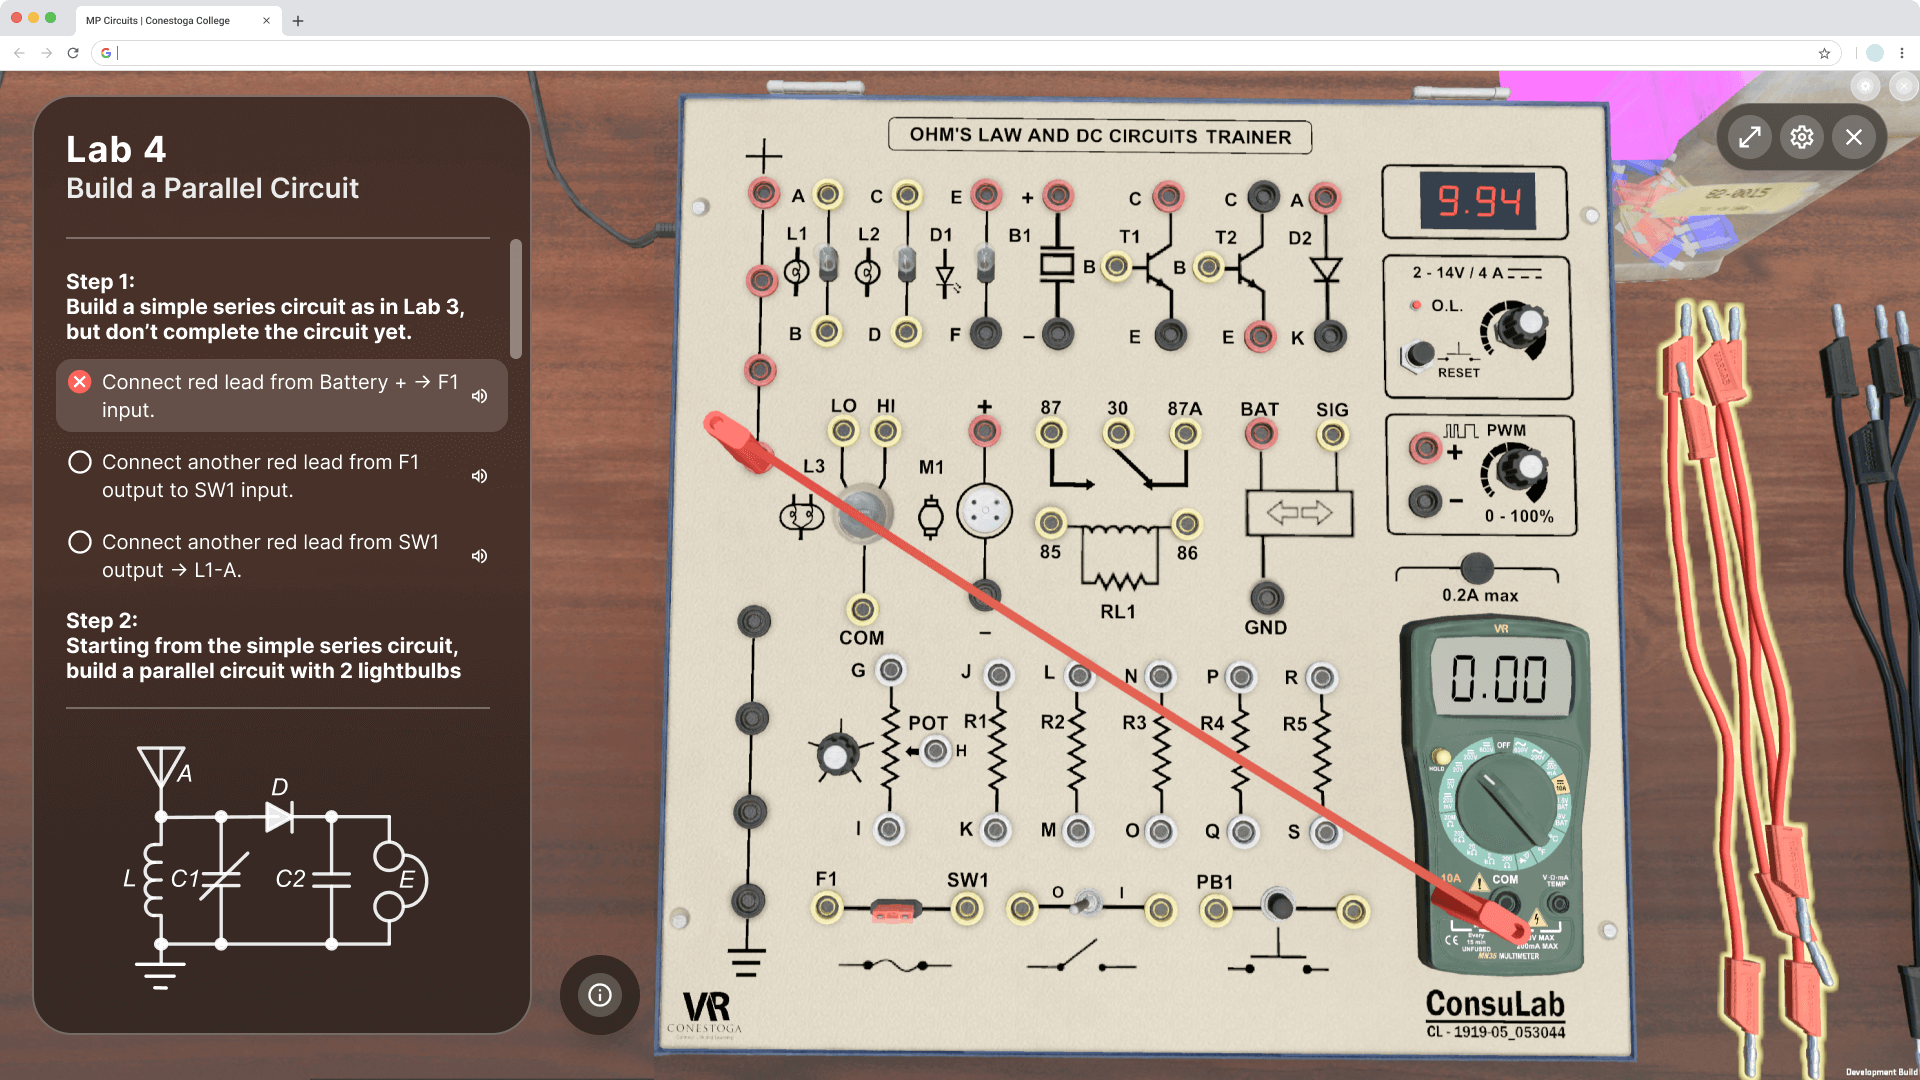
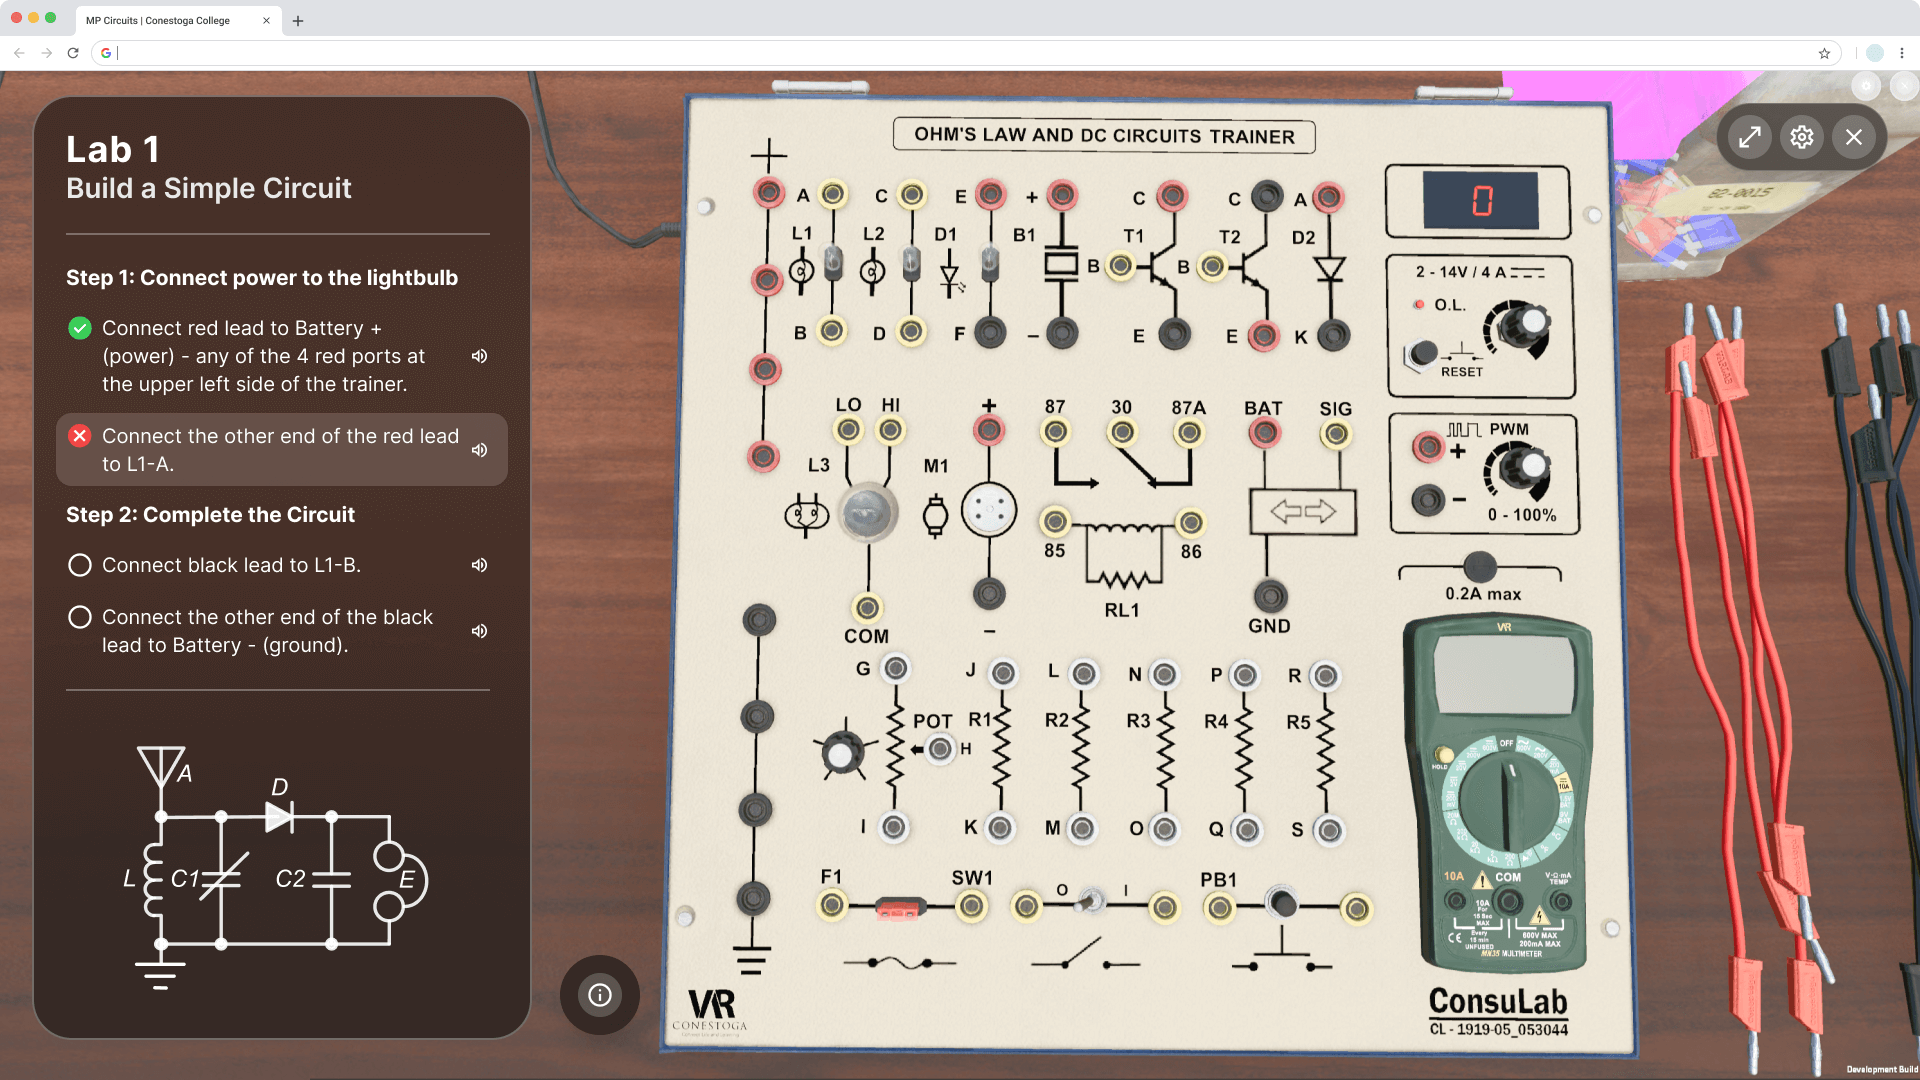
Some of the High(er)-Fidelity Screens
PS – These screenshots are from the developer build, so you’ll see some rough edges. In the final build, the jumper leads on the right are in full view.
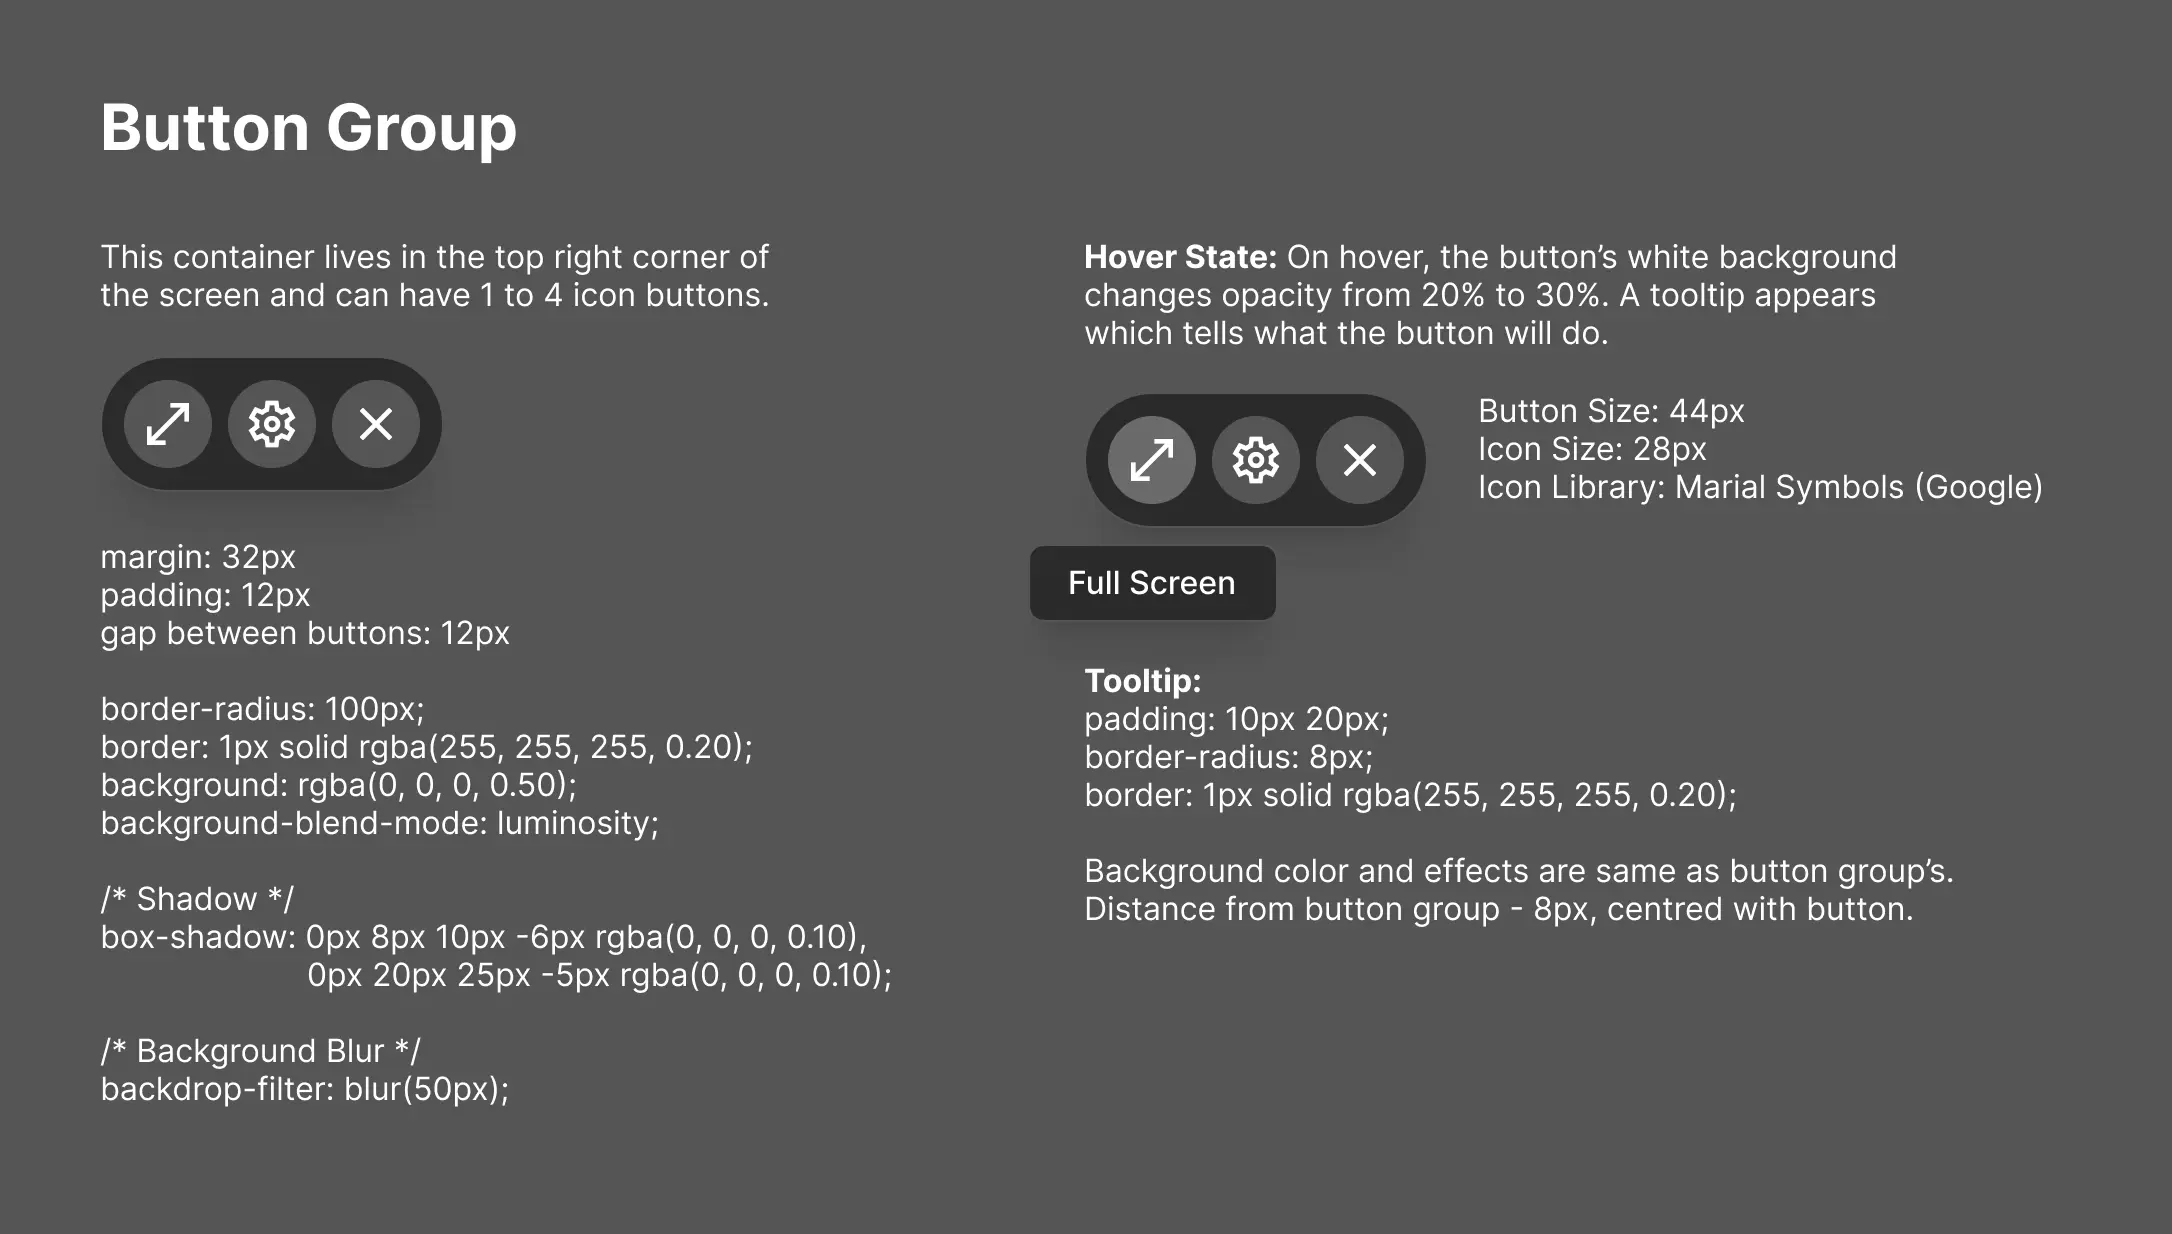
Developer Handoff
I prepared detailed design specifications in Confluence, and linked them to the relevant Jira tickets.
(Click on any image for a full-screen view.)
Interaction Demos for Devs
I included video recordings and GIFs, like the ones below, to convey interactions clearly to developers
Measuring Success
In our pursuit of creating a workbench-style virtual lab to enhance students’ understanding of electrical circuits, we’ve established clear metrics to gauge the project’s success in the upcoming term. These indicators, summarized below, will guide our evaluation:
Skill Proficiency Increase: A minimum of 10% improvement in students’ electrical circuit skills over the term will be considered a success.
User Engagement Rate: Maintaining an average user engagement rate of at least 75% throughout the term will indicate successful adoption.
Completion Rate of Lab Exercises: Achieving a lab exercise completion rate of 80% or higher during the term will signify success.
Learnings
Balancing Development Time and UX: Striking a balance between development speed and UX quality is a core challenge. We learned the importance of achieving optimal usability without overloading development resources.
Understanding Stakeholder Intent: We realized the significance of looking beyond surface-level requests from stakeholders. By delving into their underlying motivations, we could create data-backed designs that satisfied their needs while improving user experiences.
These learnings underscore the intricate nature of UX design and development, emphasizing the need for a harmonious synergy between the two and how strategic communication and data-driven decisions can lead to enhanced user experiences while efficiently managing resources.


